Stay connected to your Webafrica email on your Android device using the Gmail app or Samsung Email. This guide will walk you through the setup step by step.
Before You Start
Make sure you have:
✅ Your full email address (example: name@webafrica.org.za)
✅ Your email password
✅ A stable internet connection (WiFi or mobile data)
Tip: We recommend using IMAP as it keeps your emails synced across all your devices.
Your Email Settings
Use these settings during setup:
Incoming Mail Server (IMAP)
| Setting | Value |
|---|---|
| Server | imap.webafrica.org.za |
| Port | 993 |
| Security Type | SSL/TLS |
| Username | Your full email address |
| Password | Your email password |
Outgoing Mail Server (SMTP)
| Setting | Value |
|---|---|
| Server | smtp.webafrica.org.za |
| Port | 465 |
| Security Type | SSL/TLS |
| Authentication | Required |
| Username | Your full email address |
| Password | Your email password |
Option 1: Set Up Email Using the Gmail App (Recommended)
Most Android phones already include the Gmail app.
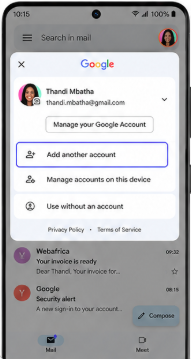
Step 1: Open Gmail
Open the Gmail app on your Android device.
Tap your profile picture in the top-right corner and select:
Add another account
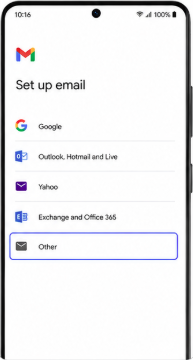
Step 2: Choose Email Type
Tap:
Other
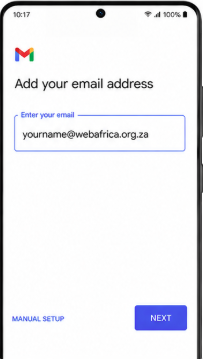
Step 3: Enter Your Email Address
Type your full Webafrica email address.
Example:
yourname@webafrica.org.za
Tap Next.
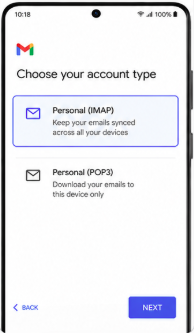
Step 4: Select Account Type
Choose:
Personal (IMAP)
We recommend IMAP because it keeps your inbox synced across devices.
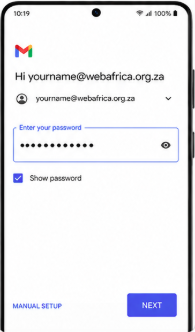
Step 5: Enter Your Password
Enter your mailbox password and tap Next.
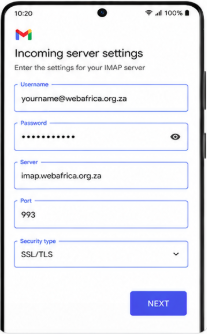
Step 6: Configure Incoming Server Settings
Confirm the following settings:
| Setting | Value |
|---|---|
| Username | Full email address |
| Password | Your email password |
| Server | imap.webafrica.org.za |
| Port | 993 |
| Security | SSL/TLS |
Tap Next.
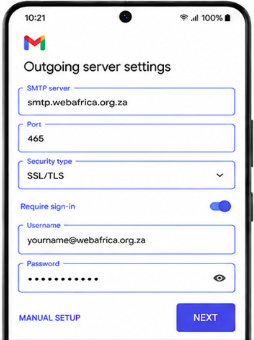
Step 7: Configure Outgoing Server Settings
Enter:
| Setting | Value |
|---|---|
| SMTP Server | smtp.webafrica.org.za |
| Port | 465 |
| Security | SSL/TLS |
| Require Sign-in | Enabled |
| Username | Full email address |
| Password | Your email password |
Tap Next.
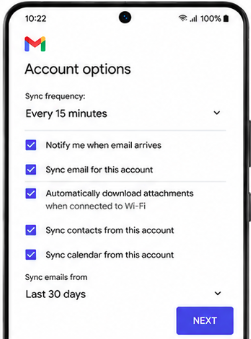
Step 8: Complete Setup
Choose your sync preferences and tap Next.
Your mailbox will begin syncing automatically.
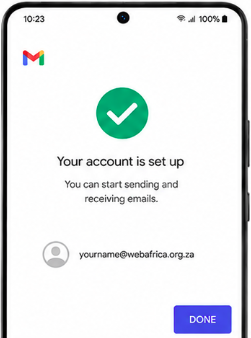
Step 9: Setup Complete
Your Webafrica email account has been added successfully.
Tap Done.
Option 2: Set Up Email Using Samsung Email
If you have a Samsung phone, you may prefer using the Samsung Email app.
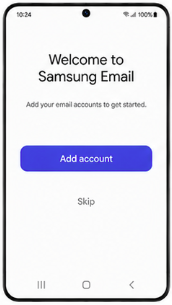
Step 1: Open Samsung Email
Open the Samsung Email app.
Tap:
Add Account
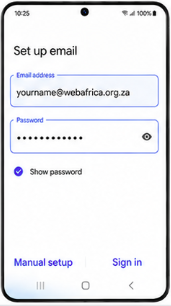
Step 2: Enter Your Email Address and Password
Enter:
- Your full email address
- Your mailbox password
Tap:
Manual Setup
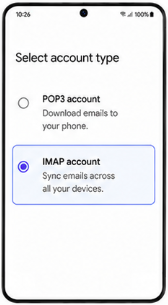
Step 3: Select IMAP
Choose:
IMAP account
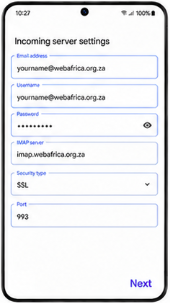
Step 4: Configure Incoming Mail Settings
Use:
| Setting | Value |
|---|---|
| Email Address | Full email address |
| Username | Full email address |
| Password | Your email password |
| IMAP Server | imap.webafrica.org.za |
| Security Type | SSL |
| Port | 993 |
Tap Sign in or Next.
Step 5: Configure Outgoing Mail Settings
Enter:
| Setting | Value |
|---|---|
| SMTP Server | smtp.webafrica.org.za |
| Security Type | SSL |
| Port | 465 |
| Require Authentication | Enabled |
| Username | Full email address |
| Password | Your email password |
Tap Next.

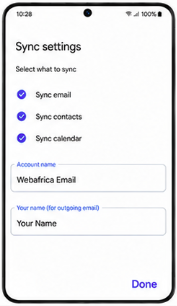
Step 6: Finish Setup
Choose your sync preferences and account name.
Your Webafrica mailbox will now sync to your device.
Tap Done.
Common Setup Issues
Incorrect Username or Password
Make sure:
- You are using your full email address
- Your password is entered correctly
- There are no extra spaces before or after the password
Emails Are Not Sending
Check that:
- SMTP server is set to
smtp.webafrica.org.za - Port is
465 - Authentication is enabled
- SSL/TLS security is selected
Emails are not being received
Check that:
- IMAP server is
imap.webafrica.org.za - Port is
993 - SSL/TLS security is enabled
Need to Add Another Email Account?
You can repeat the same steps to add additional Webafrica mailboxes.