GETTING STARTED
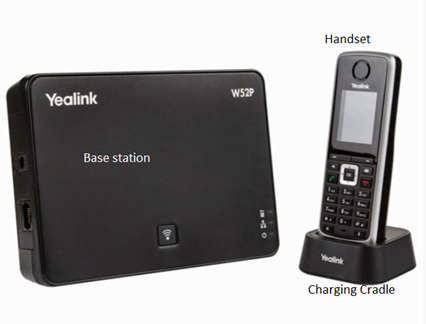
With most IP-based devices such as routers and VoIP phones, you can log into the device via a web browser using the IP address of the device – and the W52P is no different.

Logging into and configuring your Yealink phone system
Check that the physical set-up is correct.
- Ensure that your base station is connected to your router using an Ethernet/LAN cable.
Finding your device’s IP is easy. Use a handset that is already associated with the connected base station. Press “OK >
Status” and the relevant IP details will be displayed on the handset’s screen. In other words, on the phone, press “OK” twice.

FIRST LOGINS
You can access the Yealink W52P by entering the IP address in your web browser. This is the case for any standard ADSL router too.
- If you have no IP address it means the handset is not registered to the base station.
To register the handset to the base station press the ![]() button on the base station for two seconds, then press “OK” on the handset.
button on the base station for two seconds, then press “OK” on the handset.

This will take you to a login screen. The default login credentials to most Yealink devices is:
Username: admin and Password: admin as per below:

MANUALLY CONFIGURING THE SIP ACCOUNT
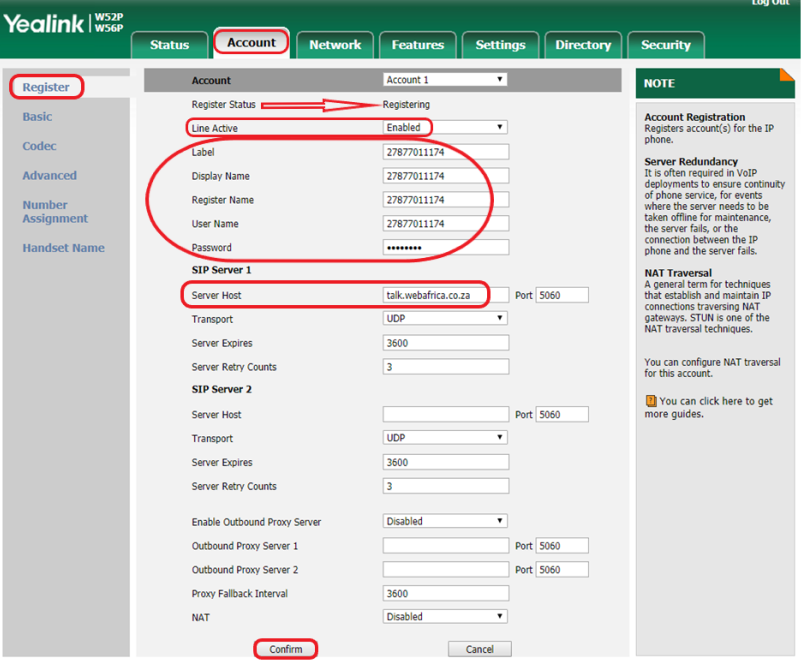
On the first page after login, select the “Account” Tab then “Register” on the menu on the left.
On the “Account” page, go to “Line Active” and select “Enabled”
Once enabled, you will need to complete the following fields with the VoIP number (as per the screenshot):
- Label
- Display Name
- Register Name
- Username (Username and Register Name are generally the same and are the value determined on the client’s account)
- Password
- Server Host (Under SIP Server 1) (This can be either hostname or IP of the VoIP server)
Once complete and in order, scroll down and select “Confirm”.

You will see the page refresh and change from a “Registering” state to a “Registered” state.
If you have an issue and the page doesn’t change to a “Registered” state and perform the troubleshooting steps outlined for you.
ADDING AN ADDITIONAL HANDSET TO AN EXISTING LINE
If you have two handsets and only one VoIP account you will need to allocate both handsets to use the same line. To do this follow the above guide to add an account.
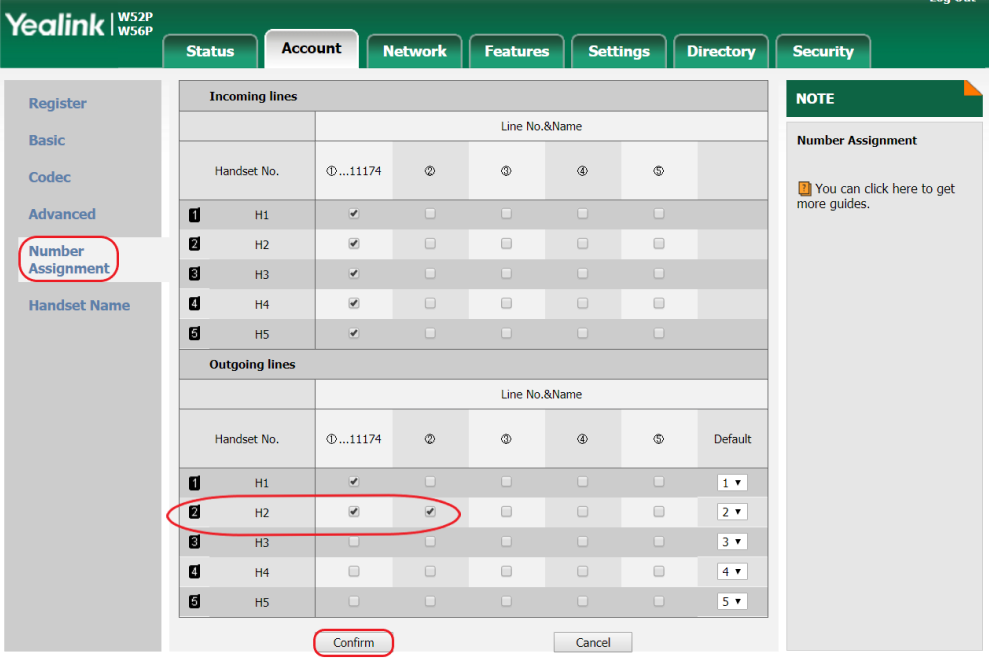
Once completed select “Number Assignment” under the “Account” tab.
The device is capable of having five lines and five handsets assigned to it in total, as you can see in the screen below.

After checking that both handsets are paired to the base station, ensure that the second handset is assigned to the account you have configured on line 1.
Selecting confirm will save the settings. Should you receive a call on your line, both phones will ring.
FACTORY RESET
If you are faced with a situation where you need to reset the base station to clear all the configurations that were present on the device, you will need to log into the device following the first guide shown in this document.
Once in, select the “Settings” tab.
Then select the “Upgrade” option.

A screen with the option to “Reset to factory setting” will appear. Please select this option.

You will be asked to confirm this action, select “OK”.
The device will take a few minutes to perform the reset and once complete you will need to reconfigure the device as seen above in the past sections.
Please see our PDF attached with Set-up guide and Comprehensive guide.
HOW TO DISABLE GHOST CALLS
- At the top of the Yealink control panel click on the tab labelled “Features”
- On the left side menu of the features tab click the tab called “General Information”
- At the bottom of the page you will see the following options:
- Accept SIP Trust Server Only – this should be enabled
- Allow IP Call – this should be disabled
Save your changes and exit the page.
You should no longer receive ghost calls.

Please note: All Webafrica deals and packages are subject to change without notification. These include our terms and conditions as it relates to costs and deal/package structures for all of our service providers.
